Search This Blog

About Me

Highly experienced in implementation and customization of Alfresco. More than 11 years of experience working on Alfresco, versions ranging from 2.x to 5.x. Successfully processed innovative and tailored CMS solutions to meet ever-changing business requirements for multiple clients. Role Includes : Experience in Alfresco Upgrades, SOLR migration, Proposals, Team Handling, Delivery, Content Migration, POC's etc.. Extensive experience in client co ordination, working on offshore-onshore model and project take over. Technical Expertise Includes : Java, JSP, Servlet, JSF, JavaScript, AJAX, Spring, SQL, Hibernate, Web Services(REST). Specialities Includes : Content Migration, Product Customization, Business CMS Solutions, Workflow, Project Transition.
Showing posts with label Alfresco. Show all posts

Tuesday, February 21, 2017

Understanding Alfresco 5 Development Environment Projects/Modules


I am writing this to project details about projects/modules present in Alfresco 5 development environment.
Starting Alfresco 5, 'Alfresco Explorer' is deprecated and so as it's JSF Framework.
If you go to http://<domain>:<port>/alfresco, you will not be getting any login page now, instead you will see a welcome page with some links, shown below.

Since there is no JSF code, the project structure is also changed, so as the development environment.
After setting up out of the box development environment for alfresco 5, you will see new project structure as shown below.
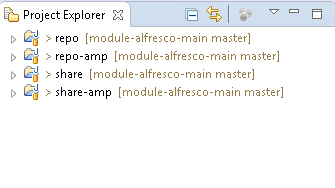


There are 4 oob development modules including alfresco and share:

  1. repo
  2. repo-amp
  3. share
  4. share-amp
repo :- Repo is main alfresco module which is responsible for building/generating alfresco war (repo.war) with customized code as dependency. 

repo-amp :- Repo-amp module is defined for adding any custom code into alfresco. It is been added as a dependency into repo module. It generates an amp+jar file with custom code and injects into alfresco war as a module.


share :- Like repo module, share module is also a main module for building share war with customized code and dependency.

share-amp :- share-amp module is the customized module for share custom development. It is been added as a dependency into share module. It generates an amp+jar file with custom code and injects into sharewar as a module.

Incorporating Custom Code/Module Changes In Repo War 


1. Import your module, if it is separate, into same work space where you have your maven alfresco set up.

2. If the changes are in main module, incorporate those changes in main alfresco module (repo) with appropriate folder structure under amp.

3. I am writing steps to incorporate custom code present in a custom module. You can add changes under repo-amp as well.

4. In your development environment repo is your main alfresco module. Open it's pom.xml (repo/pom.xml).

5. You will see dependencies and overlay of repo-amp, alfresco-scc by defualt under dependencies tag. If you have any changes under these 2 modules, you can keep it, else comment them out so that you do not have unnecessary modules in your war. Note:- Do not comment repo-amp if you are incorporating changes into repo-amp module.

6. Add dependency and overlay of your custom module into repo/pom.xml. Adding sample code below with a custom web script module example :

Note:- this is for custom module only. For repo-amp, dependencies are already there out of the box.

<!-- If you want to pick module from repository -->

 <dependency>
         <groupId>org.anuj.test</groupId>
         <artifactId>module-alfresco-webscripts</artifactId>
         <version>1.0-SNAPSHOT</version>
         <type>amp</type>
         <scope>provided</scope>
        </dependency>
    </dependencies>

<!-- If you want to pick module pom from local machine -->

 <dependency>
         <groupId>org.anuj.test</groupId>
         <artifactId>module-alfresco-webscripts</artifactId>
         <version>1.0-SNAPSHOT</version>
         <type>amp</type>
         <scope>system</scope>
         <systemPath>C:\Users\<Logged In User>\.m2\repository\org\anuj\test\module-alfresco-                 
                   webscripts\1.0-SNAPSHOT\module-alfresco-webscripts-1.0-
                   SNAPSHOT.amp</systemPath>
        </dependency>
    </dependencies>

<!-- Entry under Overlay -->

                            <groupId>org.anuj.test</groupId>
             <artifactId>module-alfresco-webscripts</artifactId>
                            <type>amp</type>
                        </overlay>
                    </overlays>


The above entries in pom will tell maven to add code during build in your repo war.

7. Now go to your custom module. It's pom should mention it's parent as below:

 <parent>
        <groupId>org.anuj.test</groupId>
        <artifactId>alfresco5</artifactId>
        <version>1.0-SNAPSHOT</version>
        <relativePath>../module-alfresco-main</relativePath> 
    </parent>

8. Build your custom module so that it's amp get's added in repository and local.

Use mvn install (-DskipTests=true if you want to skip unit tests).
In case you want to push to repository use command appropriately.

9. Once build is complete, you will see amp created in maven repository as well as jar created under target.

10. Now build repo pom. You should see it picking up custom module in logs. On successful build, a repo war will be generated under target directory with your custom module code.

11. You can verify your changes in exploded war under target folder.

12. Copy repo.war under tomcat/webapps and rename it to alfresco.

13. Start tomcat.

14. Verify your custom code changes, in my case I verified by hitting webscript url.

15. Once changes looks OK in alfresco war, apply ui related changes in Share module (I will be writing another blog for custom Share changes).

16. If you have done Share changes and testing of your custom functionality looks green, go ahead and point to actual content, indexes and database. Make sure you have back up of all.

17. Start alfresco and check for errors, if any.

18. On successful start, again do a sanity check for functionality.

19. Check alfresco version in System Details as well as in logs.

Tuesday, February 7, 2017

Alfresco Community Upgrade from 4.2.e to 5.0.0

I am writing this blog with reference to my recent practice activity of upgrade from alfresco community version 4.2.e to alfresco community version 5.0.0 having customized code on Windows 7.

I will be using one separate module with custom code to be incorporated into Alfresco 5 war. Subsequently you can use same approach if you have many modules.


Pre-Requisites


There are some prerequisites as well as some standard steps you need to follow, like software requirements, backup strategy etc.
Of course it is been written in alfresco upgrade prerequisites checklist as well.
Some are :

1. Maven 3.x
2. Java 7 +
3. Eclipse


Alfresco 5 Installation


As a first step towards migration, you need to first install a vanilla Alfresco version to which you want to upgrade either intermediate or final.
Make sure you have a clean db and space for fresh installation.
If you want to use SOLR 1.4 with Alfresco 5, you can select the same during installation or else if you are upgrading to SOLR 4 as well, choose SOLR 4.
You can select both options and decide later which one you want to use.

After installation, please do a sanity if everything is looking good. Means you are able to add content and able to search as well.

Development Environment Set Up For War Generation


Refer - http://86anuj.blogspot.com/2017/01/alfresco-development-environment.html for setting up dev environment in eclipse.

Navigate to project folder in command prompt and use below command to generate a vanilla war as well as for maven dependencies to download. Later on we will incorporate custom module/code changes.

mvn install (-DskipTests=true if you want to skip unit tests)

This will generate war under target directory under your project.

Incorporating Custom Code Changes In War 


1. Import your module, if it is separate into same work space where you have your maven alfresco set up.

2. If the changes are in main module, incorporate those changes in main alfresco module (repo) with appropriate folder structure under amp.

3. I am writing steps to incorporate custom code present in a module.

4. In your development environment repo is your main alfresco module. Open it's pom.xml (repo/pom.xml).

5. You will see dependencies and overlay of repo-amp, alfresco-scc by defualt under dependencies tag. If you have any changes under these 2 modules, you can keep it, else comment them out so that you do not have unnecessary modules in your war.

6. Add dependency and overlay of your custom module into repo/pom.xml. Adding sample code below with a custom web script module example :

<!-- If you want to pick module from repository -->

 <dependency>
        <groupId>org.anuj.test</groupId>
        <artifactId>module-alfresco-webscripts</artifactId>
        <version>1.0-SNAPSHOT</version>
        <type>amp</type>
        <scope>system</scope>
        <systemPath>C:\Users\921189.INDIA\.m2\repository\org\anuj\test\module-alfresco-                 
                   webscripts\1.0-SNAPSHOT\module-alfresco-webscripts-1.0-
                   SNAPSHOT.amp</systemPath>
        </dependency>
    </dependencies>

<!-- If you want to pick module pom from local machine -->

 <dependency>
         <groupId>org.anuj.test</groupId>
         <artifactId>module-alfresco-webscripts</artifactId>
         <version>1.0-SNAPSHOT</version>
         <type>amp</type>
         <scope>system</scope>
         <systemPath>C:\Users\<User>\.m2\repository\org\anuj\test\module-alfresco-                 
                   webscripts\1.0-SNAPSHOT\module-alfresco-webscripts-1.0-
                   SNAPSHOT.amp</systemPath>
        </dependency>
    </dependencies>

<!-- Entry under Overlay -->

                            <groupId>org.anuj.test</groupId>
            <artifactId>module-alfresco-webscripts</artifactId>
                            <type>amp</type>
                        </overlay>
                    </overlays>


The above entries in pom will tell maven to add code during build in your repo war.

7. Now go to your custom module. It's pom should mention it's parent as below:

 <parent>
        <groupId>org.anuj.test</groupId>
        <artifactId>alfresco5</artifactId>
        <version>1.0-SNAPSHOT</version>
        <relativePath>../module-alfresco-main</relativePath> 
    </parent>

8. Build your custom module so that it's amp get's added in repository and local.

Use mvn install (-DskipTests=true if you want to skip unit tests).
In case you want to push to repository use command appropriately.

9. Once build is complete, you will see amp created in maven repository as well as jar created under target.

10. Now build repo pom. You should see it picking up custom module in logs. On successful build, a repo war will be generated under target directory with your custom module code.

11. You can verify your changes in exploded war under target folder.

12. Copy repo.war under tomcat/webapps and rename it to alfresco.

13. Start tomcat.

14. Verify your custom code changes, in my case I verified by hitting webscript url.

15. Once changes looks OK in alfresco war, apply ui related changes in Share module (I will be writing another blog for custom Share changes).

16. If you have done Share changes and testing of your custom functionality looks green, go ahead and point to actual content, indexes and database. Make sure you have back up of all.

17. Start alfresco and check for errors, if any.

18. On successful start, again do a sanity check for functionality.

19. Check alfresco version in System Details as well as in logs.


Monday, January 16, 2017

Alfresco Development Environment Set Up - Community Version 4.2.e

Alfresco provides archetype for quick set up of development environment.

You can follow below steps for setting up development environment in eclipse.

# Pre Requisite

1. Maven 3.x
2. Java 7 +
3. Eclipse

1. Create a folder.
2. Open command prompt.
3. Navigate to folder you have created.
4. Generate a maven project (archeType) using below command

mvn archetype:generate -DarchetypeCatalog=http://artifacts.alfresco.com/nexus/content/groups/public/archetype-catalog.xml -Dfilter=org.alfresco.maven.archetype:

this will generate interactive mode and you will get options to download sdk's depending on your requirement.

5. Select all in one option . This will download all sdk's/projects (alfresco, share etc). You can work independently on them.

6. Now select archetype version, this is aligned to alfresco build versions.

You can verify alfresco versions against sdk's here.

7. Provide group id (kind of package name), artifact id (project name) and version (set this to default, unless you know about any specific version)

8. Now you will see folders generated with pom's. These are alfresco projects for development.

9. For adding these projects into eclipse follow below steps.

a. Open eclipse workspace.
b. In project explorer, right click and select import.
c. Select existing maven project.
d. Navigate to folder you had created above.
e. Select all alfresco downloaded projects and import them.
f. Your projects are ready for development.

10. Building project and generating war with custom code.

a. Open command prompt.
b. Navigate to project you want to build and generate war.
c. Type mvn package.
d. Wait for sometime, a war will be generated in project target folder.
 e.  You can copy generated war under tomcat instance.

11. Some more useful maven commands for alfresco

Command Description
mvn package Runs unit tests and packages AMP in ${project.build.directory}
/${project.build.finalName}.amp
mvn install Like mvn package but also installs AMP in local Maven repository
to be depended upon
mvn test Runs unit tests
mvn install -DskipTests=true Like mvn install but skips unit tests
mvn install -Prun Like mvn install but also triggers the runner project to run
Alfresco, Share, Solr and Web Quick Start in Tomcat
(with H2 embedded database)
mvn clean -Ppurge Removes DB, alf_data, indexes and log files. Useful to purge
the development repo (by default self contained in
${project.basedir}/alf_data_dev.


Note:

This is an important command to use if you change significant settings in your project - for example you change the Alfresco edition from Community to Enterprise. It is important to purge databases and other
data that might otherwise be persisted.
mvn install -Pamp-to-war,rad Similar to mvn install -Pamp-to-war but also adds support for remote
JUnit running and for hot reloading with JRebel (requires appropriate MAVEN_OPTS configuration).


Thursday, April 22, 2010

Running Alfresco Community 3.2 First Foundation Client SDK

  1. Set up Tomcat bundled Alfresco alfresco-community-tomcat-3.2 on your local machine.

    You can download it here. Start it once before you run first foundation client.

  2. Download alfresco-community-sdk-3.2 from here.
  3. Open your eclipse, import alfresco-community-sdk-3.2.zip.
  4. Select projects Alfresco Embedded, SDK First Foundation Client
  5. Click on Finish
  6. Provide dir.root, db.username, db.password, db.driver, db.url into custom-repository.properties present in SDK Project.
  7. Add all the jars present in "\alfresco-community-tomcat-3.2\tomcat\webapps\alfresco\WEB-INF\lib" to your SDK project's build path
  8. Also add your respective database driver and servlet jar file as it's not provided into the lib.
  9. Now build the SDK project
  10. Make sure your tomcat is not running, if yes, shut it down. I do not know why but it is generating JVM Bind error when we run FFC with tomcat server running.
  11. Run First Foundation Client.

I hope you will not face any issues running it.

After it's been run successfully, start your tomcat, you will see a new file created in company home space.

Thursday, April 15, 2010

Overriding the default update action of alfresco


Alfresco's default update action just replaces the contents of the document without changing its name and other properties.

 
This blog deals with overriding the default update action with your customized one.

 
As update action consists of a dialog in which you needs to browse and select a new document from your local machine, a new upload jsp file needs to be written which will take care of the upload part and will perform the function which you have over ridden.

 
If you want to add a dialog on the action you provide, then you have to register it into 'web-client-config-dialogs-custom.xml' (here after we will mention it as 'dialogs-custom.xml')

Like, if you want to display your custom view details page on clicking of view details link action, you can define it here with bean reference for that particular jsp.

 
Suppose if you have defined your custom update link action on clicking which, you want your custom update jsp page should appear, you can define it here like –

 
[Note – I am just providing the update action and its dialog here, rest you can change as per the steps I have mentioned here]


Actions Tag in actions-custom.xml

 
<!-- Update document -->

     <action id="update_doc">

     <permissions>

     <permission allow="true">Write</permission>

     </permissions>

     <evaluator>org.alfresco.web.action.evaluator.UpdateDocEvaluator</evaluator>

     <label-id>update</label-id>

     <image>/images/icons/update.gif</image>

     <action-listener>#{CheckinCheckoutDialog.setupContentAction}</action-listener>

     <action>dialog:updateFile</action> <!-- Dialog Name -->    

<params>
     <param name="id">#{actionContext.id}</param>

     </params>

    </action>


  <!-- Dialog Tag in dialogs.xml -->   

 
<dialog name="updateFile" page="/jsp/extension/custom-update-file.jsp" managed-

bean="UpdateFileDialog" icon="/images/icons/update_large.gif" title-id="update"

        description-id="updatefile_description"/>

 
Now when you use customized update action link, your custom update jsp file will appear with update button.

When you select the file from your local system and click on update, your overridden method will get called.

 
Here is the class file with overridden Update method.

 
Do not forget to register your bean into faces-config-custom.xml

 
<managed-bean>
<description>The bean for the Update File Screen.</description>
<managed-bean-name> UpdateFileDialog</managed-bean-name>
<managed-bean-class>
com.test.update.UpdateFileDialog
</managed-bean-class>
<managed-bean-scope>session</managed-bean-scope>
<managed-property>
<property-name>property</property-name>
<value>#{CCProperties}</value>
</managed-property>
</managed-bean>


Adding a custom action in alfresco action column of the content and in view details page


Whenever you want to add any kind of action link into alfresco, you need to make changes into 'web-client-config-actions.xml' or 'web-client-config-actions-custom.xml'.

As alfresco says, it's better to make changes in custom file as it keeps you code separate from alfresco and is easy for debugging also.
Suppose you want to add an action 'Approved' for particular document.
You want this action to appear in actions column and in view details of your content.
Below are the steps of doing this

  1. Define an action in web-client-config-actions-custom.xml (here after we will mention it as 'actions-custom.xml') inside <alfresco-config> and <config> tags
    I am providing the whole action tag with description of each tag

<action id="approveDoc"> - A valid ID for your action
    <permissions>
       <permission allow="true">Write</permission> - Default Permissions
   </permissions>

<label>Profile Review Complete</label> - Label to display when you put your mouse over the action text

<label-id>approve_document</label-id> - Name to appear in JSP
   <image>/images/icons/green_tick.gif</image> - Icon to appear in JSP
  <action-listener>
            #{[YOUR BEAN NAME].[METHOD TO CALL]} – Bean method to call when action is performed
   </action-listener>
   <action>[Outcome]</action> - This is to navigate the page when action is completed
   <params>
       <param name="id">#{actionContext.id}</param> - Specifically for getting the node ref from context id
   
</params>
</action>

  1. Define an action-group in actions-custom.xml inside <alfresco-config> and <config> tag

    This action group name will need to be used for displaying the actions in JSP file

    /* For Actions column */
    <action-group id="approve_doc_actions_browse">
       <show-link>false</show-link>
       <style-class>inlineAction</style-class>
       <action idref="approveDoc" />
    </action-group>

    /* For view details page*/

    <action-group id="approve_doc_actions_details">
           <action idref="approveDoc" /> - The action which we have defined above
        
    </action-group>

3. Use below tag to display the action into the actions column of the content in browse page

<%-- Content Actions column --%>

<a:column id="fo_col18" actions="true" style="text-align:left"
rendered="#{NavigationBean.searchContext == null}">
    <f:facet name="header">
     <h:outputText id="fo_col-txt" value="#{msg.actions}"/>

</f:facet> 
<a:actionLink id="fo_col-act" value="#{r.name}" href="#{r.url}"
target="new" image="#{r.fileType16}" showLink="false" styleClass="inlineAction" />
<%-- actions are configured in web-client-config-actions.xml --%>
<r:actions id="fo_col-acts" value="approve_doc_actions_browse" context="#{r}"
showLink="false" styleClass="inlineAction" />

</a:column>


  1. Use below tag to display the action into view details page of the content

    <%-- Document Actions --%>

    <a:panel label="#{msg.actions}" id="actions-panel" border="white" bgcolor="white" titleBorder="lbgrey" expandedTitleBorder="dotted" titleBgcolor="white" style="text-align:center" progressive="true" expanded='#{DialogManager.bean.panels["actions-panel"]}'
    expandedActionListener="#{DialogManager.bean.expandPanel}">

        <r:actions id="actions_doc" value="fo_doc_details_actions"             context="#{DialogManager.bean.document}"
        verticalSpacing="3" style="white-space:nowrap" />

    </a:panel>

    1. Define the label text to be displayed in JSP in webclient.properties
        approve_document=Approved

  Now you have created your new customized action link.

Similarly you can create more actions and display it in one action group.

Wednesday, March 10, 2010

Different approaches of Accessing Alfresco Services

As alfresco services are the only tools we can use for making any changes inside alfresco. Here i am writing some of the approaches for getting them.

There are three approaches i have used till now for accessing the alfresco services ( Searchservice, NodeService etc) in a class.

1. Accessing through application context.

As mentioned in alfresco documentation and in examples too, we can get the application context object from alfresco utility class 'ApplicationContextHelper'

// Do not forget to include alfresco jars into your project
ApplicationContext ctx = ApplicationContextHelper.getApplicationContext();

Now from application context, get the service registry bean having all the registered services for alfresco, like this

ServiceRegistry serviceRegistry = (ServiceRegistry) ctx.getBean(ServiceRegistry.SERVICE_REGISTRY);

And from this service registry object you can get any alfresco services, for e.g like this

SearchService searchService = serviceRegistry.getSearchService();
NodeService nodeService = serviceRegistry.getNodeService();


OR

You can get it by following these steps also

ApplicationContext appContext = new ClassPathXmlApplicationContext("alfresco/application-context.xml");

ServiceRegistry registry = (ServiceRegistry)appContext.getBean(ServiceRegistry.SERVICE_REGISTRY);


2. Getting services from repository directly

SearchService searchService = Repository.getServiceRegistry(FacesContext.getCurrentInstance()).getSearchService();

3. Setting services into properties in faces context and accessing it directly just by declaring getters and setters

a. Register your bean into faces-config-custom.xml and set the services you want to use in your class between <manage-property> tag with property-name and value, for example, below i have declared search service to be used into the bean i am declaring


<managed-bean>
<description>{Bean Description You want to Provide}</description>
<managed-bean-name>{Bean Name}</managed-bean-name>
<managed-bean-class>
{Package Name.Bean Name}
</managed-bean-class>
<managed-bean-scope>session</managed-bean-scope>
<managed-property>
<property-name>searchService</property-name>
<value>#{SearchService}</value>
</managed-property>       
</managed-bean>


b. Declare and write the getters and setters for the properties you have declared and want to use in your class

public class TestClass
{
private SearchService searchService;
/** Your code */
public SearchService getSearchService() {
return searchService;
}
public void setSearchService(SearchService searchService) {
this.searchService = searchService;
}
}

Wednesday, December 23, 2009

Getting the list of groups the user is a member of..in Alfresco


Hello Guys,

Here is the code or just a function to find out the groups of which user is a member of.
Please find the below code, you can use it from any class just by passing ApplicationContext and the Group Name as a parameters.

public static boolean isCurrentUserInGroup(ApplicationContext context, String groupName)
{
// The authority service returns authorities with their AuthorityDAO type
// prefix prepended to the name, so we'll do that as well
groupName = AuthorityType.GROUP.getPrefixString() + groupName;
final ServiceRegistry serviceRegistry = (ServiceRegistry)
context.getBean(ServiceRegistry.SERVICE_REGISTRY);
// get the current user
String currentUserName =
serviceRegistry.getAuthenticationService().getCurrentUserName();
// get the list of groups this user is a member of
Set authorityList = serviceRegistry.getAuthorityService().getContainingAuthorities
(AuthorityType.GROUP, currentUserName, false);
System.out.println("authorityList--"+authorityList);
// look in the list to see if groupName is in there. If so, return true;
return authorityList.contains(groupName);
}


Tuesday, December 8, 2009

Running SDK FirstFoundationClient


FirstFoundationClient is the first project you tries to run from eclipse IDE
Do the following set ups before you run its main method

1. In custom-repository.properties file inside package source.alfresco.extension

Set paths of dir.root and dir.indexes
e.g

dir.root=D:/myAlfresco/alf_data
dir.indexes=D:/myAlfresco/alf_data/lucene-indexes

Also provide the driver and database details of the database you are using
e.g, In my case, i have used postgreSQL database, so details will be

db.driver=org.postgresql.Driver
db.url=jdbc:postgresql://localhost:5432/myalfresco
db.username=myalfresco
db.password=myalfresco

2. In custom-alfresco-shared.properties file inside package source.alfresco.extension
un comment avm.jmxrmi.port and avm.remote.port ( you can change the port numbers if getting jmxrmi port error while running FFC)


3. If you are not having custom-hibernate-dialect.properties inside package source.alfresco.extension, you can copy it from here. (remove txt extension)
Un comment your hibernate dialect property with respect to your database.
I have uncommented for my postgreSQL databse

4. Register your hibernate file in custom-repository-context.xml file inside package source.alfresco.extension. You can check my file here. (remove txt extension)

5. Now start your alfresco server and run FirstFoundationClient.java. hope you will get it running successfully. Restart the server and you will see a new file in company home space.


Note - You may get bind error, but it won't effect your program.
One more thing i forgot to mention, upload respective database jar into SDK FFC project build path.


thanks,
Anuj

Monday, November 10, 2008

Alfresco FTP Socket Error


I was getting the JVM_Bind error in tomcat console while starting, that was because of FTP Server error 
I have commented the alfresco FTP code and its working fine for me now - - - 
Here is what i have done - - -


Disabled FTP by commenting out the FTP bean in the
projects/repository/config/alfresco/bootstrap-context.xml file:


–>


If you are not able to find bootstrap-context.xml file, search for it in alfresco folder