I am writing this to project details about projects/modules present in Alfresco 5 development environment.
Starting Alfresco 5, 'Alfresco Explorer' is deprecated and so as it's JSF Framework.
If you go to http://<domain>:<port>/alfresco, you will not be getting any login page now, instead you will see a welcome page with some links, shown below.
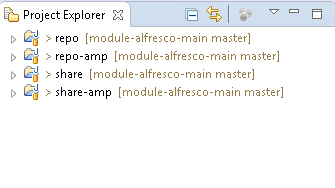
After setting up out of the box development environment for alfresco 5, you will see new project structure as shown below.
- repo
- repo-amp
- share
- share-amp
repo :- Repo is main alfresco module which is responsible for building/generating alfresco war (repo.war) with customized code as dependency.
repo-amp :- Repo-amp module is defined for adding any custom code into alfresco. It is been added as a dependency into repo module. It generates an amp+jar file with custom code and injects into alfresco war as a module.
share :- Like repo module, share module is also a main module for building share war with customized code and dependency.
share-amp :- share-amp module is the customized module for share custom development. It is been added as a dependency into share module. It generates an amp+jar file with custom code and injects into sharewar as a module.
Incorporating Custom Code/Module Changes In Repo War
1. Import your module, if it is separate, into same work space where you have your maven alfresco set up.
2. If the changes are in main module, incorporate those changes in main alfresco module (repo) with appropriate folder structure under amp.
3. I am writing steps to incorporate custom code present in a custom module. You can add changes under repo-amp as well.
4. In your development environment repo is your main alfresco module. Open it's pom.xml (repo/pom.xml).
5. You will see dependencies and overlay of repo-amp, alfresco-scc by defualt under dependencies tag. If you have any changes under these 2 modules, you can keep it, else comment them out so that you do not have unnecessary modules in your war. Note:- Do not comment repo-amp if you are incorporating changes into repo-amp module.
6. Add dependency and overlay of your custom module into repo/pom.xml. Adding sample code below with a custom web script module example :
Note:- this is for custom module only. For repo-amp, dependencies are already there out of the box.
<!-- If you want to pick module from repository -->
<dependency>
<groupId>org.anuj.test</groupId>
<artifactId>module-alfresco-webscripts</artifactId>
<version>1.0-SNAPSHOT</version>
<type>amp</type>
<scope>provided</scope>
</dependency>
</dependencies>
<!-- If you want to pick module pom from local machine -->
<dependency>
<groupId>org.anuj.test</groupId>
<artifactId>module-alfresco-webscripts</artifactId>
<version>1.0-SNAPSHOT</version>
<type>amp</type>
<scope>system</scope>
<systemPath>C:\Users\<Logged In User>\.m2\repository\org\anuj\test\module-alfresco-
webscripts\1.0-SNAPSHOT\module-alfresco-webscripts-1.0-
SNAPSHOT.amp</systemPath>
</dependency>
</dependencies>
<!-- Entry under Overlay -->
<groupId>org.anuj.test</groupId>
<artifactId>module-alfresco-webscripts</artifactId>
<type>amp</type>
</overlay>
</overlays>
The above entries in pom will tell maven to add code during build in your repo war.
7. Now go to your custom module. It's pom should mention it's parent as below:
<parent>
<groupId>org.anuj.test</groupId>
<artifactId>alfresco5</artifactId>
<version>1.0-SNAPSHOT</version>
<relativePath>../module-alfresco-main</relativePath>
</parent>
8. Build your custom module so that it's amp get's added in repository and local.
Use mvn install (-DskipTests=true if you want to skip unit tests).
In case you want to push to repository use command appropriately.
9. Once build is complete, you will see amp created in maven repository as well as jar created under target.
10. Now build repo pom. You should see it picking up custom module in logs. On successful build, a repo war will be generated under target directory with your custom module code.
11. You can verify your changes in exploded war under target folder.
12. Copy repo.war under tomcat/webapps and rename it to alfresco.
13. Start tomcat.
14. Verify your custom code changes, in my case I verified by hitting webscript url.
15. Once changes looks OK in alfresco war, apply ui related changes in Share module (I will be writing another blog for custom Share changes).
16. If you have done Share changes and testing of your custom functionality looks green, go ahead and point to actual content, indexes and database. Make sure you have back up of all.
17. Start alfresco and check for errors, if any.
18. On successful start, again do a sanity check for functionality.
19. Check alfresco version in System Details as well as in logs.

