Search This Blog

About Me

Highly experienced in implementation and customization of Alfresco. More than 11 years of experience working on Alfresco, versions ranging from 2.x to 5.x. Successfully processed innovative and tailored CMS solutions to meet ever-changing business requirements for multiple clients. Role Includes : Experience in Alfresco Upgrades, SOLR migration, Proposals, Team Handling, Delivery, Content Migration, POC's etc.. Extensive experience in client co ordination, working on offshore-onshore model and project take over. Technical Expertise Includes : Java, JSP, Servlet, JSF, JavaScript, AJAX, Spring, SQL, Hibernate, Web Services(REST). Specialities Includes : Content Migration, Product Customization, Business CMS Solutions, Workflow, Project Transition.

Monday, January 14, 2019

Alfresco Live Search Doesn't Return System Folders

Alfresco OOB do not return system created files and folders using share and live search.
This Alfresco could probably be intentionally kept to keep system created folders skipped while searching in repository.

If you have files or folders you have created by System user via webscripts or scheduled jobs.
And want these files and folders to appear in live or share search.
Follow couple of simple overrides mentioned below.

1. Go to https://svn.alfresco.com/repos/alfresco-open-mirror/web-apps/Share/trunk/share-services/src/main/resources/alfresco/templates/webscripts/org/alfresco/slingshot/search/search.get.js

2. Create a folder structure under shared/classes/alfresco/extension/templates/webscripts/org/alfresco/slingshot/search

3. Copy the file search.get.js from above svn link and do below change

3.1 Change import from classpath:/alfresco/templates/webscripts/org/alfresco/slingshot/search/search.lib.js to classpath:/alfresco/extension/templates/webscripts/org/alfresco/slingshot/search/search.lib.js

4. Create another file search.lib.js in same shared location and copy contents from svn https://svn.alfresco.com/repos/alfresco-open-mirror/web-apps/Share/trunk/share-services/src/main/resources/alfresco/templates/webscripts/org/alfresco/slingshot/search/search.lib.js

5. Add below changes at line number 1184

5.1

 /*fqs.push('-TYPE:"cm:thumbnail" AND -TYPE:"cm:failedThumbnail" AND -TYPE:"cm:rating" AND -TYPE:"st:site"' +
               ' AND -ASPECT:"st:siteContainer" AND -ASPECT:"sys:hidden" AND -cm:creator:system AND -QNAME:comment\\-*'); */
fqs.push('-TYPE:"cm:thumbnail" AND -TYPE:"cm:failedThumbnail" AND -TYPE:"cm:rating" AND -TYPE:"st:site"' +
               ' AND -ASPECT:"st:siteContainer" AND -ASPECT:"sys:hidden" AND -QNAME:comment\\-*');

6. Restart the server.

You should be getting system created files and folders in search results now.

Wednesday, August 2, 2017

Some Alfresco Best Practices

1.   Do not Customize alfresco OOB code unless necessary for business requirement.
2.   Do not perform any changes from JMX in clustered environment as it overrides your defined properties for all clustered nodes.
3.   Develop different custom functionalities in different modules.
4.   Use web scripts for integration with external application.
5.   Perform in place bulk upload for migration of large data chunk.
6.   Use ingestion node (non user activity node) for any migration activity.
7.   Keep indexing servers separate from user facing nodes for faster indexing and processing time.
8.   Always perform performance testing before doing environmental/JVM changes in production.
9.   Any custom Content model should be created carefully keeping inheritance and future aspects in mind.
10. Disable indexing for properties which are just for visual purpose and not required for search.
11. If any property is been used in multiple content types, always create/add it in aspects.
12. Keep nab on solr properties mergefactor, tracking time and filtercache.
13. Use appropriate memory for SOLR nodes, you can use following url
      http://docs.alfresco.com/4.2/concepts/solrnodes-memory.html.
14. Vaidate search query before incorporating it in your code. Take special care when you are using wild cards.
15. Do not create residual properties.
16. Always follow alfresco recommendation for folder structure and number of documents in folder.
17. Never keep more than 3K documents/folders at 1st child level, this will slow down navigation.
18. Always do enhancements in extension folder.
19. Keep internal SOLR tracking communication in http rather than https.
20. Set number of days document needs to be kept in Archive store.
21. Keep versioning enabled for default content type only if absoluely necessary.

Tuesday, February 21, 2017

Understanding Alfresco 5 Development Environment Projects/Modules


I am writing this to project details about projects/modules present in Alfresco 5 development environment.
Starting Alfresco 5, 'Alfresco Explorer' is deprecated and so as it's JSF Framework.
If you go to http://<domain>:<port>/alfresco, you will not be getting any login page now, instead you will see a welcome page with some links, shown below.

Since there is no JSF code, the project structure is also changed, so as the development environment.
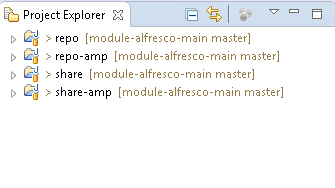
After setting up out of the box development environment for alfresco 5, you will see new project structure as shown below.


There are 4 oob development modules including alfresco and share:

  1. repo
  2. repo-amp
  3. share
  4. share-amp
repo :- Repo is main alfresco module which is responsible for building/generating alfresco war (repo.war) with customized code as dependency. 

repo-amp :- Repo-amp module is defined for adding any custom code into alfresco. It is been added as a dependency into repo module. It generates an amp+jar file with custom code and injects into alfresco war as a module.


share :- Like repo module, share module is also a main module for building share war with customized code and dependency.

share-amp :- share-amp module is the customized module for share custom development. It is been added as a dependency into share module. It generates an amp+jar file with custom code and injects into sharewar as a module.

Incorporating Custom Code/Module Changes In Repo War 


1. Import your module, if it is separate, into same work space where you have your maven alfresco set up.

2. If the changes are in main module, incorporate those changes in main alfresco module (repo) with appropriate folder structure under amp.

3. I am writing steps to incorporate custom code present in a custom module. You can add changes under repo-amp as well.

4. In your development environment repo is your main alfresco module. Open it's pom.xml (repo/pom.xml).

5. You will see dependencies and overlay of repo-amp, alfresco-scc by defualt under dependencies tag. If you have any changes under these 2 modules, you can keep it, else comment them out so that you do not have unnecessary modules in your war. Note:- Do not comment repo-amp if you are incorporating changes into repo-amp module.

6. Add dependency and overlay of your custom module into repo/pom.xml. Adding sample code below with a custom web script module example :

Note:- this is for custom module only. For repo-amp, dependencies are already there out of the box.

<!-- If you want to pick module from repository -->

 <dependency>
         <groupId>org.anuj.test</groupId>
         <artifactId>module-alfresco-webscripts</artifactId>
         <version>1.0-SNAPSHOT</version>
         <type>amp</type>
         <scope>provided</scope>
        </dependency>
    </dependencies>

<!-- If you want to pick module pom from local machine -->

 <dependency>
         <groupId>org.anuj.test</groupId>
         <artifactId>module-alfresco-webscripts</artifactId>
         <version>1.0-SNAPSHOT</version>
         <type>amp</type>
         <scope>system</scope>
         <systemPath>C:\Users\<Logged In User>\.m2\repository\org\anuj\test\module-alfresco-                 
                   webscripts\1.0-SNAPSHOT\module-alfresco-webscripts-1.0-
                   SNAPSHOT.amp</systemPath>
        </dependency>
    </dependencies>

<!-- Entry under Overlay -->

                            <groupId>org.anuj.test</groupId>
             <artifactId>module-alfresco-webscripts</artifactId>
                            <type>amp</type>
                        </overlay>
                    </overlays>


The above entries in pom will tell maven to add code during build in your repo war.

7. Now go to your custom module. It's pom should mention it's parent as below:

 <parent>
        <groupId>org.anuj.test</groupId>
        <artifactId>alfresco5</artifactId>
        <version>1.0-SNAPSHOT</version>
        <relativePath>../module-alfresco-main</relativePath> 
    </parent>

8. Build your custom module so that it's amp get's added in repository and local.

Use mvn install (-DskipTests=true if you want to skip unit tests).
In case you want to push to repository use command appropriately.

9. Once build is complete, you will see amp created in maven repository as well as jar created under target.

10. Now build repo pom. You should see it picking up custom module in logs. On successful build, a repo war will be generated under target directory with your custom module code.

11. You can verify your changes in exploded war under target folder.

12. Copy repo.war under tomcat/webapps and rename it to alfresco.

13. Start tomcat.

14. Verify your custom code changes, in my case I verified by hitting webscript url.

15. Once changes looks OK in alfresco war, apply ui related changes in Share module (I will be writing another blog for custom Share changes).

16. If you have done Share changes and testing of your custom functionality looks green, go ahead and point to actual content, indexes and database. Make sure you have back up of all.

17. Start alfresco and check for errors, if any.

18. On successful start, again do a sanity check for functionality.

19. Check alfresco version in System Details as well as in logs.

Tuesday, February 7, 2017

Alfresco Community Upgrade from 4.2.e to 5.0.0

I am writing this blog with reference to my recent practice activity of upgrade from alfresco community version 4.2.e to alfresco community version 5.0.0 having customized code on Windows 7.

I will be using one separate module with custom code to be incorporated into Alfresco 5 war. Subsequently you can use same approach if you have many modules.


Pre-Requisites


There are some prerequisites as well as some standard steps you need to follow, like software requirements, backup strategy etc.
Of course it is been written in alfresco upgrade prerequisites checklist as well.
Some are :

1. Maven 3.x
2. Java 7 +
3. Eclipse


Alfresco 5 Installation


As a first step towards migration, you need to first install a vanilla Alfresco version to which you want to upgrade either intermediate or final.
Make sure you have a clean db and space for fresh installation.
If you want to use SOLR 1.4 with Alfresco 5, you can select the same during installation or else if you are upgrading to SOLR 4 as well, choose SOLR 4.
You can select both options and decide later which one you want to use.

After installation, please do a sanity if everything is looking good. Means you are able to add content and able to search as well.

Development Environment Set Up For War Generation


Refer - http://86anuj.blogspot.com/2017/01/alfresco-development-environment.html for setting up dev environment in eclipse.

Navigate to project folder in command prompt and use below command to generate a vanilla war as well as for maven dependencies to download. Later on we will incorporate custom module/code changes.

mvn install (-DskipTests=true if you want to skip unit tests)

This will generate war under target directory under your project.

Incorporating Custom Code Changes In War 


1. Import your module, if it is separate into same work space where you have your maven alfresco set up.

2. If the changes are in main module, incorporate those changes in main alfresco module (repo) with appropriate folder structure under amp.

3. I am writing steps to incorporate custom code present in a module.

4. In your development environment repo is your main alfresco module. Open it's pom.xml (repo/pom.xml).

5. You will see dependencies and overlay of repo-amp, alfresco-scc by defualt under dependencies tag. If you have any changes under these 2 modules, you can keep it, else comment them out so that you do not have unnecessary modules in your war.

6. Add dependency and overlay of your custom module into repo/pom.xml. Adding sample code below with a custom web script module example :

<!-- If you want to pick module from repository -->

 <dependency>
        <groupId>org.anuj.test</groupId>
        <artifactId>module-alfresco-webscripts</artifactId>
        <version>1.0-SNAPSHOT</version>
        <type>amp</type>
        <scope>system</scope>
        <systemPath>C:\Users\921189.INDIA\.m2\repository\org\anuj\test\module-alfresco-                 
                   webscripts\1.0-SNAPSHOT\module-alfresco-webscripts-1.0-
                   SNAPSHOT.amp</systemPath>
        </dependency>
    </dependencies>

<!-- If you want to pick module pom from local machine -->

 <dependency>
         <groupId>org.anuj.test</groupId>
         <artifactId>module-alfresco-webscripts</artifactId>
         <version>1.0-SNAPSHOT</version>
         <type>amp</type>
         <scope>system</scope>
         <systemPath>C:\Users\<User>\.m2\repository\org\anuj\test\module-alfresco-                 
                   webscripts\1.0-SNAPSHOT\module-alfresco-webscripts-1.0-
                   SNAPSHOT.amp</systemPath>
        </dependency>
    </dependencies>

<!-- Entry under Overlay -->

                            <groupId>org.anuj.test</groupId>
            <artifactId>module-alfresco-webscripts</artifactId>
                            <type>amp</type>
                        </overlay>
                    </overlays>


The above entries in pom will tell maven to add code during build in your repo war.

7. Now go to your custom module. It's pom should mention it's parent as below:

 <parent>
        <groupId>org.anuj.test</groupId>
        <artifactId>alfresco5</artifactId>
        <version>1.0-SNAPSHOT</version>
        <relativePath>../module-alfresco-main</relativePath> 
    </parent>

8. Build your custom module so that it's amp get's added in repository and local.

Use mvn install (-DskipTests=true if you want to skip unit tests).
In case you want to push to repository use command appropriately.

9. Once build is complete, you will see amp created in maven repository as well as jar created under target.

10. Now build repo pom. You should see it picking up custom module in logs. On successful build, a repo war will be generated under target directory with your custom module code.

11. You can verify your changes in exploded war under target folder.

12. Copy repo.war under tomcat/webapps and rename it to alfresco.

13. Start tomcat.

14. Verify your custom code changes, in my case I verified by hitting webscript url.

15. Once changes looks OK in alfresco war, apply ui related changes in Share module (I will be writing another blog for custom Share changes).

16. If you have done Share changes and testing of your custom functionality looks green, go ahead and point to actual content, indexes and database. Make sure you have back up of all.

17. Start alfresco and check for errors, if any.

18. On successful start, again do a sanity check for functionality.

19. Check alfresco version in System Details as well as in logs.


Monday, January 16, 2017

Setting Up Maven Proxy

When you are working behind a firewall, you can get connection refused error while downloading dependencies from maven repository.

You can fix it by setting up proxy in your maven's settings.xml

1. Open your maven installation directory.
2. Go to conf/settings.xml
3. Look for <proxies> tag.
4. Add below proxy profile

 <proxy>
      <id>optional</id>
      <active>true</active>
      <protocol>http</protocol>
      <username>YOUR DOMAIN USERNAME</username>
      <password>ACTUAL PASSWORD</password>
      <host>PROXY YOU ARE WORKING BEHIND</host> <!-- You can get this from internet explorer                                                                                                       - internet options - connections - LAN                                                                                                            settings -->
      <port>PROXY PORT (Can get same from above)</port>
      <nonProxyHosts>local.net|some.host.com</nonProxyHosts>
 </proxy> 


5. Save settings.xml
6. Try downloading dependencies again.

Setting up Git Proxy

Sometimes you keep working behind firewall which can block your access to git repository.
In order to download git project/modules, you might need to set up proxy so that it can connect to github crossing firewall.

You can use below command in git bash console and try to clone the project.


##Setting Git Proxy###

$ git config --global http.proxy http://<PASSWORD>@<PROXY NAME>:<PROXY PORT>

Alfresco Development Environment - Community Version 5.0.0


Alfresco provides archetype for quick set up of development environment.You can follow below steps for setting up development environment in eclipse.

# Pre Requisite

1. Maven 3.x and 2.x

2. Java 7 +

3. Eclipse


1. Create a folder.

2. Open command prompt.

3. Navigate to folder you have created.

4. Generate a maven project (archeType) using below command with Maven 2.1 as 3.x doesn't generate interactive mode. You can set Maven 3.x in path again after archetype generation.

mvn archetype:generate -Dfilter=org.alfresco:

this will generate interactive mode and you will get options to download sdk's depending on your requirement.

5. Select all in one option . This will download all sdk's/projects (alfresco, share etc). You can work independently on them.

6. Now select archetype version, this is aligned to alfresco build versions.

    You can verify alfresco versions against sdk's here.

7. Provide group id (kind of package name), artifact id (project name) and version (set this to default, unless you know about any specific version)

8. Now you will see folders generated with pom's. These are alfresco projects for development.

9. For adding these projects into eclipse follow belo steps.

a. Open eclipse workspace.

b. In project explorer, right click and select import.

c. Select existing maven project.

d. Navigate to folder you had created above.

e. Select all alfresco downloaded projects and import them.

f. Your projects are ready for development.

10. Building project and generating war

a. Open command prompt.

b. Navigate to project (repo/share).

c. Type mvn package.

d. Wait for sometime, a war will be generated under target folder.

e. You can copy generated war under tomcat instance by renaming from repo to alfresco.

11. Some more useful maven commands for alfresco


Command                           Description


mvn package                        Runs unit tests and packages AMP in ${project.build.directory}                                                                   /${project.build.finalName}.amp


mvn install                            Like mvn package but also installs AMP in local Maven repository
                                            to be depended upon

mvn test                                Runs unit tests

mvn install -DskipTests=true  Like mvn install but skips unit tests

mvn install -Prun                    Like mvn install but also triggers the runner project to run

Alfresco, Share, Solr and Web Quick Start in Tomcat (with H2 embedded database)


mvn clean -Ppurge                 Removes DB, alf_data, indexes and log files. Useful to purge the development                                              repo (by default self contained in ${project.basedir}/alf_data_dev.

Note:
This is an important command to use if you change significant settings in your project - for example you change the Alfresco edition from Community to Enterprise. It is important to purge databases and other
data that might otherwise be persisted.

mvn install -Pamp-to-war,rad   Similar to mvn install -Pamp-to-war but also adds support for remote

JUnit running and for hot reloading with JRebel (requires appropriate MAVEN_OPTS configuration).